10/14/10

Asian Spiced Pork Chops w/ Pan Fried Udon Noodles!!


We love Asian food in our house, whether it is simple Chinese take out like fried rice or beef with broccoli, or going out to a nice Japanese steakhouse for hibachi steak or chicken and all that comes with it.  After a recent visit to a new Japanese steakhouse in our neighborhood, we were introduced to grilled Udon noodles.  They were brought precooked on a tray and slapped on the grill in front of us, seasoned with spices and soy sauce and heaped into bowls.  Now we pretty much like any type of pasta in our house and this was no exception, everyone loved it!  A few days later everyone was still talking about the noodles and wanted some more so I decided to try them myself.  I watched the cook make them in front of us that night and it looked simple enough.......and it was!  These noodles are a great alternative to rice and take less time to make.  I pair them with beef, chicken, pork or fish which I marinade in a simple blend of Asian spices and grill or broil in the oven.

For the marinade:
1 cup soy sauce
1 tbs. Thai chili garlic sauce (more if you like spicy like me)
Juice of 1 lime
1/4 cup of orange juice
1/4 cup sesame oil
1/4 cup olive oil
11/2 tsp. fresh grated ginger
4-6 garlic cloves chopped
1 tbs. honey
2 tbs. rice wine vinegar
3 scallions chopped
2 tbs. chopped cilantro

As I've stated previously, when I cook I do not measure out the ingredients and these are just approximations.  This marinade is very versatile and flexible and can be tailored to your  particular tastes, if you like spicy add more chili sauce, if you don't like ginger or scallions leave them out, etc.  For this recipe we had some pork chops in the fridge so that is what I used, it could just have easily been done with chicken, steak or even fish.


Place the pork chops in a large bowl or Ziploc bag, add all the ingredients of the marinade.  Allow the meat to marinade for at least 20 minutes to an hour to allow the flavors to penetrate and flavor the chops.  While the meat is marinating, turn your attention to the Udon noodles.  Chop or grate 3 cloves of garlic and 1 tsp. of fresh ginger, set aside.  You will also need some sesame seeds, about 1-2 tsp. depending on how much you like them (again you can leave them out). Bring a pot of water to boil to cook the noodles, they only cook for about four minutes in the water so don't drop them yet.


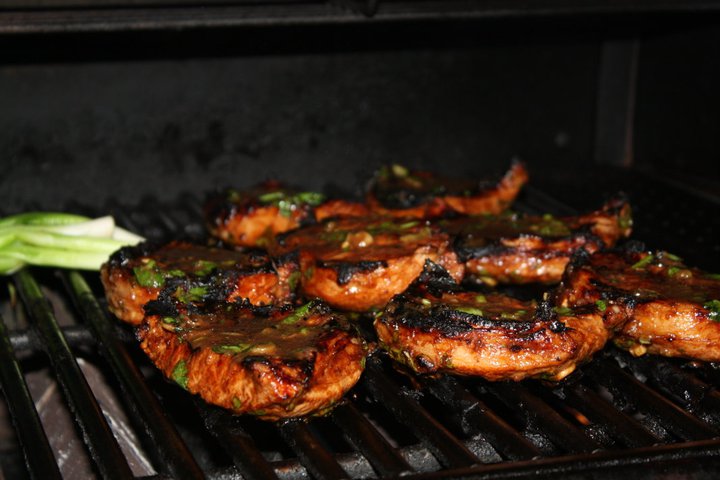
After the meat is finished marinating bring it to the grill.  Obviously you can also cook in the oven or under the broiler if you prefer.  Place the chops on the grill and spoon some of the marinade on top, cook the chops for a few minutes turning a quarter turn halfway through to get nice grill marks.  Turn the chops over and cook the same way with a little marinade on top turning a quarter turn halfway through on the other side. The total cooking time for these chops was about 6-8 minutes per side.  When they are cooked through remove them to a plate to rest, be careful not to over cook the pork they will dry out.


10/12/10

Pot Roast Soup

     This recipe is based on a soup my dad used to make.  Yes, dad did a lot of cooking too, in fact he used to cook all the weekday meals since both  my parents worked and he was the first one home.  I don't think dad really enjoyed cooking that much, it was just something he had to do, even though he was pretty good and very often was quite creative (you never knew what you were gonna get that night).  One thing was for sure though, dinner was at a certain time and you had better be home or else.  Many a time I had to leave in the middle of a baseball, football, or basketball game to teasing chants of "I gotta go home and eat" from my friends!

     When I make soups, I usually do so in 2 different pots.  In the first pot, I have whatever meat will be in the soup and build a stock with it along with some veggie scraps, and spices.  In the second pot, I have the vegetables that will be in the finished soup along with some spices and a container of store bought stock. Do all your prep work in advance, it makes things go much smoother and quicker, so I always start by doing all my chopping and cutting first. For this soup I like a lot of meat because it comes out so tender and delicious.  I usually buy 1 large pot roast or 2 smaller ones.  I prefer to buy the bone in pot roast because it adds flavor to the soup.  For this particular batch of soup I made they had no bone in pot roast so I bought a large boneless one and added 2 beef shanks to help flavor the soup.  You can even buy beef bones at the store and use them along with a boneless pot roast, entirely up to you.


I always put a light coating of flour on the meat before I brown it and season it generously with salt and pepper.  Brown all the pieces of meat and bone in the olive oil on both sides, all those brown bits add up to flavor in the soup. You can do them in batches so you don't overcrowd the pan and steam them instead of browning them.  After browning all the meat and/or bones, return them all to the pot and cover in beef broth and or water.  I used 1 large carton of good beef broth and the rest water.

Now you build the flavor of the soup.  Add a whole onion quartered, 8-10 whole garlic cloves, a couple of whole carrots quartered along with the tops of the celery that have been rinsed (use all the scraps left from prepping the veggies for the soup as well), add the leaves of the celery they are full of flavor don't throw them out!  Add 2 bay leaves, some large sprigs of parsley stems and all, several whole peppercorns, and some good sea salt, bring it to a boil and reduce to a simmer and let it go low and slow!

       Now on to the other pot.  In this pot I start to build a base for the soup.  As I said earlier, I like to have all my prep work done before I start to cook so you will need to cut up 5-6 carrots, 5-6 stalks of celery, 1 large onion, and  6-8 cloves of garlic.  If you like a lot of vegetables in the soup, use more, if not, use less, up to you.  I like to cut them up in rather large pieces since they are gonna cook up in the soup, it makes the soup a little heartier and more rustic.  Start by heating some olive oil in a medium soup pot, add the chopped onions and let them saute for about 6 minutes until they begin to get translucent.  Next add the garlic for a few minutes followed by the celery and carrots.  At this point I will add some sea salt and pepper and allow the veggies to cook together for about 6-8 minutes more stirring so they don't brown.  Next add 1 large can of whole or chopped San Marzano tomatoes.  Allow this to come to a good boil stirring frequently.  Now add 1 large container of beef broth and 2 bay leafs, bring to a boil again and reduce to a simmer.  Taste for salt and pepper adding if needed.
 

Allow both pots to cook low and slow. After the pot roast has cooked long enough for the meat to be tender (about 1 1/2 hours), remove the meat to a plate and check it for tenderness. It should fall apart rather easily when pulled with a couple of forks, if it does not return it to the pot to cook a little longer. If it is tender then allow it to cool enough that you can handle it and break it into the desired size pieces.  I like to leave it in large bite size pieces.


10/4/10

Old Fashioned Apple Slices!


     It's fall and the stores and markets are full of apples, the holidays are right around the corner!  If you don't count boxed cakes and brownies, we didn't do a lot of baking in my house growing up, maybe occasionally Toll House Cookies, but every year around Thanksgiving my mom would make apple slices.  The smell and flavors of these delights just scream holidays!  A few years back I started making them myself and was surprised at how easy they were, and my family just loves them.

      The other day I was at the farmer's market in Chicago and was amazed to find an unbelievable assortment of apples.  Normally I would use Granny Smith apples but with so many varieties I thought I would try something new.  The man at the market recommended an apple called Spigold, which I had never heard of or seen, so I tried them on his recommendation, "Better than Honey Crisp" the sign said, and they were!

So, on to the apples.  First you have to prep the apples by coring and peeling them all, for this recipe of one large jelly roll pan I used 11 medium to large apples.  Next you slice the apples, I used a mandolin because it is fast and slices them all the same thickness, about 1/4 in., but you can slice them by hand like you would for apple pie.  Place the sliced apples in a large bowl and immediately squeeze the juice of 1 lemon over them.  This prevents them from oxidizing as well as adding some tartness.  Now season the apples.  I must admit, I did not follow a recipe for this so these are approximate amounts, don't worry it will come out fine. If you are nervous baking this way and need a recipe for homemade dough and pie filling  or if you are afraid to try without an exact recipe, I will provide this from Saveur Magazine. The recipe is for 1 apple pie so you will probably have to triple the dough but the apple looks right.                                                                        
FOR THE PIE DOUGH:
3 cups flour
1 1⁄2 tsp. salt
1 1⁄4 cups vegetable shortening, preferably Crisco, cut into small pieces
1⁄2 cup cold milk

FOR THE FILLING:
1 1⁄2 cups sugar
3⁄4–1 cup cornstarch
1 1⁄2 tbsp. ground cinnamon
3⁄4 cup fresh lemon juice (from about 6 lemons)
12 golden delicious apples (or about 5 lbs.), peeled, cored, and sliced

This is how I did it.  Start with the sugar.  I used about a 1/2 cup of white sugar and a little more than a 1/2 cup of brown sugar.  Now add the cinnamon, about 2 tsp, a little goes a long way and you can always add more.  Grate in some fresh Nutmeg to taste. I used about 1/4 of a nutmeg ground on a micro plane, probably about 1/2 tsp. or so.  Add a pinch of allspice, 1 tsp. of salt, and about 1/3 cup of flour and mix well to coat evenly.

At this point you have to taste the apple filling.  If you don't like the taste now, you surely won't like it when they are done baking.  Adjust to your taste, more cinnamon, more nutmeg, more sugar, more lemon, too runny add more flour or cornstarch.  Depends on if you like it more sweet or more tart.
Now assemble the apple slices, as I said I used a large jellyroll pan. When it comes to the crust, you can use any recipe for pie crust that you like for example the one I provided above, and roll it out to fit in the pan, be sure to go up the sides as well.  I took a shortcut and used store bought Pillsbury pie crusts and it came out fine, saved me some time and work.  Each package has 2 pie crusts in it, and I used 3 pie crusts for the bottom and 3 for the top so I needed 3 packs of pie crust.
I started by placing one whole pie crust sheet in the middle of the pan, then I cut another in half and placed it on either end with the straight edge facing the side of the pan and the rounded half overlapping the middle. The third crust was used to fill in the holes, namely the four corners and the sides, don't worry about how it looks and let it overlap, press gently to seal any seams and be sure to go all the way up the sides and in the corners.

9/30/10

Chicken Cacciatore!!

     Chicken Cacciatore is one of those dishes that when you make it the whole house smells good, don't be surprised if the smell seeps out into the neighborhood and friends start ringing your doorbell with a knife and fork in hand!  Growing up we didn't eat this a lot, but when we did I remember thinking "we should have this more often!"  This is an old school Italian dish that you don't see a lot of in restaurants but is very good.
     Okay here is what you will need:
                                                    1 large chicken cut up in pieces
                                                    1 large onion sliced
                                                    8 cloves of garlic minced
                                                    2 peppers (any color) roughly chopped
                                                    1 lb. of mushroom sliced in large pieces
                                                    1 1/2 cups white wine
                                                    2 cans San Marzano tomatoes
                                                    2 bay leafs
                                                    Bundle of fresh thyme and oregano
                                                    Sea salt
                                                    Freshly ground black pepper
                                                    Red pepper flakes
                                                    Olive oil to coat pan
                                                    1 1/2 tbsp. brown sugar


 Start with the chicken,  you can buy the chicken already cut up or whole and cut it yourself.  I prefer to cut the breasts in two pieces, one whole breast is just too big.  If you prefer dark meat like me you can make this dish with all leg/thigh portions,  the dark meat is so much more tender and juicy, but since the wife and kids like white meat I use the whole chicken.  Get out your biggest pot and get it nice and hot, add some olive oil to the bottom of the pot.  Now after seasoning your chicken with sea salt and fresh ground black pepper, add it to the pot skin side down, don't over crowd the chicken, work in batches if you have to removing browned chicken to a plate, you want it to get a nice golden brown on both sides, if you over crowd the pan it will steam and never get brown!  

At this point you are not cooking the chicken all the way through, just browning it. Remove it to a plate and set it aside.

9/28/10

2010 Chicago Gourmet at Millenium Park


I had a chance to meet Cat Cora at the Food & Wine Fest, she was very nice and very short!!


Obviously I had quite a few samples of the 2005 Silver Oak Cab (among others)!!


9/27/10

Famous Breaded Steaks!

                                                                                  
     We used to eat these all the time when I was a kid. La Milanese on 32nd and May in Bridgeport had the best! They were made by two old Italian ladies, fried to order, smothered in red sauce, mozzarella, and pepperoncini's and put Ricobene's and all others to shame!! Mine are just as good or better!!
     What you will need:        Thin cut sandwich steaks
                                        High quality bread crumbs 
                                        Flour and eggs for breading
                                        Good crusty french bread or sandwich rolls
                                        Pot of red sauce for dipping and topping
                                        Grated Mozzarella cheese
                                        Your favorite peppers

I cut the steaks in equal size pieces before I pound them out, a little piece becomes much bigger!
     Start with the steaks.  Buy the thin cut sandwich steaks or ask your butcher to cut them for you, they are usually sirloin, rib eye work great too.  Cut the steaks in equal size pieces.  Next place them in a plastic bag or cover them with wax paper or wrap and pound them even thinner.  I like to start in the center and work my way to the ends, try to get them even thickness.
Princapessa loves to work the breading station!


Flour, egg, bread crumb, egg, bread crumb.

Season the steaks with salt a pepper and bread them in the typical flour, egg, bread crumb manner.  Obviously it is really important to use good quality bread crumbs.  You can use Italian style seasoned or unseasoned and add your own spices, just use good, fresh bread crumbs.  For these I made my own using day old French bread, cut it up, put in food processor then toasted them, came out great.  You can add salt, pepper, grated parmigiana, onion and garlic powder, fresh parsley, what ever you want.  I added salt, pepper and grated cheese.  I watched the lady at La Milanese (the place I used to get them) make them one time and she did flour, egg, breadcrumb, egg, and breadcrumb again...she double dipped, so I did that with these as well, if you like a thinner crust skip the second dip!

9/9/10

Breakfast Pizza!!!

    
     This recipe comes from an adaptation from Chow Magazine http://www.chow.com/recipes/28515-harissa-pancetta-breakfast-pizza. Obviously since this is a pizza, you can put any toppings on it you like, any cheese, meat, vegetables, sauce, that you choose. Myself and a group of friends recently cooked brunch at the Ronald McDonald House in Oak Lawn, and we made this pizza with mozzarella and cheddar cheese, bacon, eggs, scallions and parsley. It was a huge hit, everyone loved it! Next time I make it I think I am gonna do an Eggs Benedict version, with Canadian bacon, hollandaise, eggs, and maybe spinach, or a Mexican version with chorizo and Mexican cheese, you can also use breakfast sausage if you like. You can use a little pizza sauce or tomato sauce if you like but it is not necessary, and I would only recommend using a small amount of sauce. You can also make individual pizzas 7-8 in. with one egg on them and let everyone choose their own toppings!
     You can use any pizza dough you have access to, store bought, frozen, pre-made from your local pizza parlor, whatever you like.  You can even make it the night before and refrigerate it, just remember to let it come to room temperature for an hour or so before starting so it is easy to work with.  I am including a basic pizza dough recipe for those of you who want to make your own from scratch.

9/1/10

Max & Sophia's favorite "Football Soup"

     Big Papa and Chee Chee (my paternal grandparents)  got me hooked on this soup as a kid, a simple chicken  and pastina soup. Now Max and Sophia love it too (as does everyone else in the family) and they have added their own little twist, orzo pasta (shaped like footballs) instead of pastina's, and they like to call it Football Soup!  Very simple to make, and only a few ingredients:  1 whole chicken, chicken stock, celery, carrots, onion, garlic, bay leaf, salt and pepper plus the orzo pasta and fresh parley and parmiggiano reggiano for topping
     Start by placing the whole chicken in a large pot and cover it with cold water. If your chicken has the neck and innards add them as well.  When I was younger, believe or not, we used to fight over who got to eat the chicken heart with their soup, it was a true delicacy.  Now a days you rarely see it in the chicken.  Someone told me they sell them in bulk in Chinatown at a very high price. Now add a few flavoring items, basically you are making a stock as you cook the chicken for the soup.  I add the odds and ends left over from cutting the vegetables for the soup.  The celery stems and leaves (great flavor from the leaves), the ends of the carrots (plus a few cut in large pieces), an onion quartered, whole garlic cloves, a few peppercorns, a bay leaf, some of the fresh parsley with stems and some salt.  Bring to a boil and reduce to a simmer, let cook for about an hour to hour and half, until the chicken is cooked, it will start to fall apart when done.

8/31/10

Julie's Favorite: Banana Bread French Toast!


     This is my wife Julie's favorite breakfast.  I think she would eat it everyday if she could.  The kids and I now make this every Mother's Day for her for breakfast.  Start with your favorite Banana Bread recipe, there are many variations out there, I like to place toasted pecans and banana slices on the top before baking. Obviously, the banana bread should be made in advance, perhaps the night before?
One of my favorite Banana bread recipes (adapted from Tyler Florence):

Ingredients
2 cups all-purpose flour
1 1/2 teaspoons baking soda
1/2 teaspoon salt
4 overripe bananas
1 cup sugar
3/4 cup (1 1/2 sticks) unsalted butter, melted and cooled
2 large eggs
1 teaspoon pure vanilla extract
1/2 cup pecans, finely chopped

Directions:
Preheat oven to 350 degrees F and lightly grease a 9 by 5-inch loaf pan.
In a large bowl, combine the flour, baking soda, and salt; set aside.
Mash 2 of the bananas with a fork in a small bowl so they still have a bit of texture. With an electric mixer fitted with a wire whisk, whip the remaining bananas and sugar together for a good 3 minutes; you want a light and fluffy banana cream. Add the melted butter, eggs, and vanilla; beat well and scrape down the sides of the bowl. Mix in the dry ingredients just until incorporated; no need to overly blend. Fold in the nuts and the mashed bananas with a rubber spatula. Pour the batter into the prepared loaf pan. Give the pan a good rap on the counter to get any air bubbles out.
Bake for about 1 hour and 15 minutes, until golden brown and a toothpick inserted into the center of the loaf comes out clean. Don't get nervous if the banana bread develops a crack down the center of the loaf; that's no mistake, it's typical. Rotate the pan periodically to ensure even browning.
Cool the bread in the pan for 10 minutes or so, and then turn out onto a wire rack to cool completely before slicing.

 Now we need to get our toppings ready.  First, make a simple compound butter with softened butter, cinnamon, and sugar.  Return this mixture to the fridge to get cold again.

8/17/10

The Meatballs.........

     I love meatballs more than anything, and I think I have them mastered!  The key is not to mix the meat to much with your hands.  I like to use beef and pork for mine, in a 2 part beef 1 part pork ratio.  First I saute some onions and garlic, usually I will double what I need for the sauce and remove half to a bowl to cool before adding my paste and making my red sauce, then use the other half for the meatballs.  In a large bowl, add your ground meat, the cooled onions and garlic, 1egg mixed for every pound of meat, salt and pepper to taste, some chopped parsley and grated parmigiana reggiano cheese.  I also like to soak a few pieces of quality Italian bread in milk, chop it in to cubes and add it to the mix.  Now gently fold the ingredients together only as much as you need to incorporate them.  I will layer mine when mixing by adding half the beef, eggs, parsley, etc. then the pork, then the other half of the ingredients, then rest of the beef so I don't have to mix as much ( over mixing makes them hard and tough).  Now refrigerate for a while to allow mix to get cold again and come together.  Then roll the meatballs in the size you want them and brown in a skillet with olive oil, rotating them to get even brownness on all sides.  A good trick to test the seasoning is to take a small amount of the mix and cook it and taste it to see if it needs salt, more cheese whatever.

Where it all began............Red Sauce!

     When I was thinking about what my first post would be, it became obvious, the first thing I learned to cook, and to this day still my favorite......mom's spaghetti and meatballs!  No good Italian would be without a great simple recipe for this basic home dish.  I have great memories of being in the kitchen with my mom, helping in any way I could.  Usually, I would get to mix the meatball meat, and taste it raw before anyone else (knowing what we know today about eating raw meat and eggs probably wasn't the best thing for me but I loved it and never had a problem, I survived without a child seat as well!).    Start the sauce with a few simple fresh ingredients.  A yellow onion chopped, some fresh chopped garlic, a good quality olive oil ( I prefer Colavita) and some good quality canned whole tomatoes (preferable San Marzano, they are more $ but definitely worth it).  Put the tomatoes in a large bowl and remove any skin or stems.  Crush them with your fingers when you are through so you know you got them all.  I then use an immersion blender to smooth any large chunks into a nice blended sauce.  Saute the chopped onion and garlic until onion begins to become translucent, add a tablespoon of tomato paste, and some salt and saute for a few more minutes.  Then add the crushed tomatoes and stir.  Let it come to boil and reduce to a low simmer.  Now add basil, oregano, and salt and pepper to taste.  I prefer fresh herbs for my sauce but dry is okay, be careful with dried oregano, it can be overpowering.  Next, add some brown sugar.  For a fairly large batch of sauce, I would use 1 large onion,  10 cloves of garlic, maybe 2 tbs. of brown sugar, salt, pepper, oregano, basil to taste (throw in a bunch of fresh) to 6 large cans of tomatoes.  Let it cook low and slow stirring and tasting for spice for a few hours!

Introduction: Food is an expression of love!

     People always tell me after eating my food that I have to give them the recipe for this dish or that dish.  Well, for the most part, I really have no written recipes and amounts for most of my cooking, other than baking, which I'm not really crazy about.  Even when I am using someone else's recipe, I just read it and see what is in it, then recreate the dish the way I like to cook.  I cook more by sight, smell, and memory.....and the food always seams to come out the same.  I will now try however, to start writing down how much of what I use when I cook the dishes I will be putting on my blog, for my family to have as well as to share with others!!  I guess that is one of the main reasons why I have decided to start this blog!  These recipes are a mix of my own, my family's, as well as adaptations from other recipes I like to cook.  For me cooking is more than just feeding people, it is an expression of love and passion.  That is the way I learned it and remember it, and that is the way I want to pass it down to my children.  I want them to experience the same love of food and eating, it brings families and friends together and creates great memories that last a lifetime.